Chef:
Chef is a powerful tool for automation that transforms infrastructure into code. Whether you're operating in the cloud or on-premises or in Hybrid Environment. Chef automates how infrastructure is configured, deployed and managed across your network.
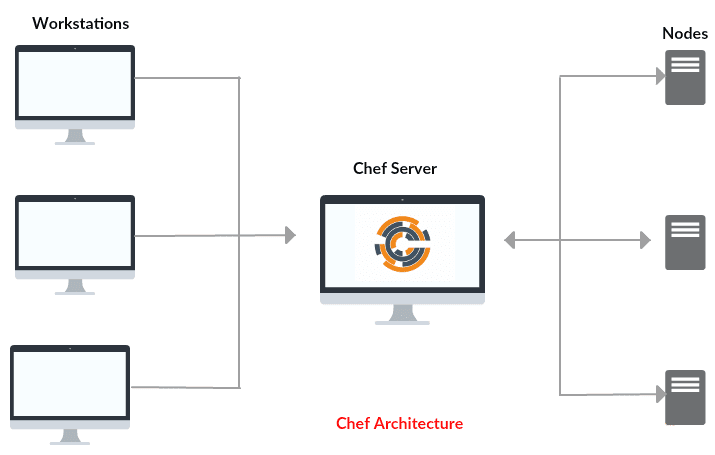
Three main part of Chef.
Prerequisites:
Follow these commands to finish the installation on Ubuntu 16.04:
To download:
To Install:
It will take a few minutes to finish the installation:
Step 2- Setup Hosted Chef Server:
Open the browser and hit this URL to sign up https://manage.chef.io/signup
Fill out your details as in picture below
Once sign up process complete, log in to your account and follow the steps below to complete initial set up.
 In the above screenshot highlighted is my Deployment kit name.
Please remember to create and upload cookbook to chef server inside this directory Because it has Chef Server organization information and private key to communicate chef server. You can check Chef server details in .chef file.
Now, We are ready to start writing recipes and start upload cookbook to Chef server.
Step 3- Start Writing Chef recipes and cookbook.
Step 4- Perform Jenkins installation on the remote machine using a cookbook.
Chef is a powerful tool for automation that transforms infrastructure into code. Whether you're operating in the cloud or on-premises or in Hybrid Environment. Chef automates how infrastructure is configured, deployed and managed across your network.
Three main part of Chef.
- Chef Workstation (SDK) - Where we write recipe and Cookbook
- Chef Server - Hold Cookbook, roles, Node information and manage Nodes
- Chef Client Node - Manage by Chef Server, each deployment and configuration done by Chef Server
Prerequisites:
- One Linux or Windows Machine (For chef Workstation)
- Chef Server account
- One Linux System to perform the installation using cookbook
Step 1- Setup Chef Workstation:
We can use either Windows or Linux system to set up as Chef Workstation. Download and install Chef workstation SDK from its official website. Download Chef SDK https://downloads.chef.io/chefdk/ and install on your favourite system.
Follow these commands to finish the installation on Ubuntu 16.04:
To download:
To Install:
It will take a few minutes to finish the installation:
Step 2- Setup Hosted Chef Server:
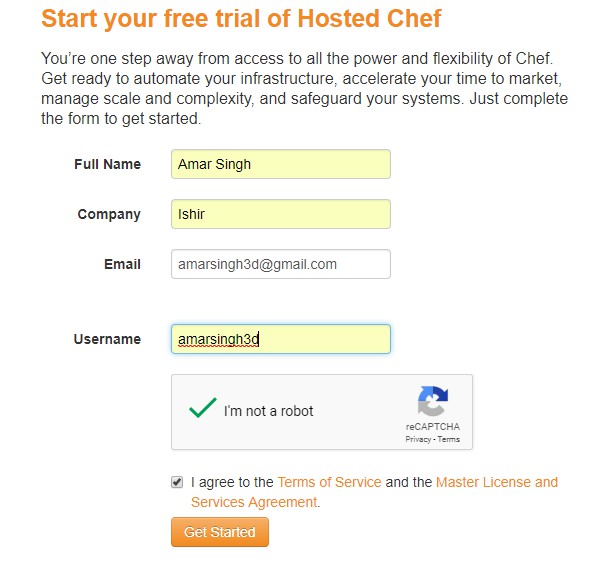
Open the browser and hit this URL to sign up https://manage.chef.io/signup
Fill out your details as in picture below
Once sign up process complete, log in to your account and follow the steps below to complete initial set up.
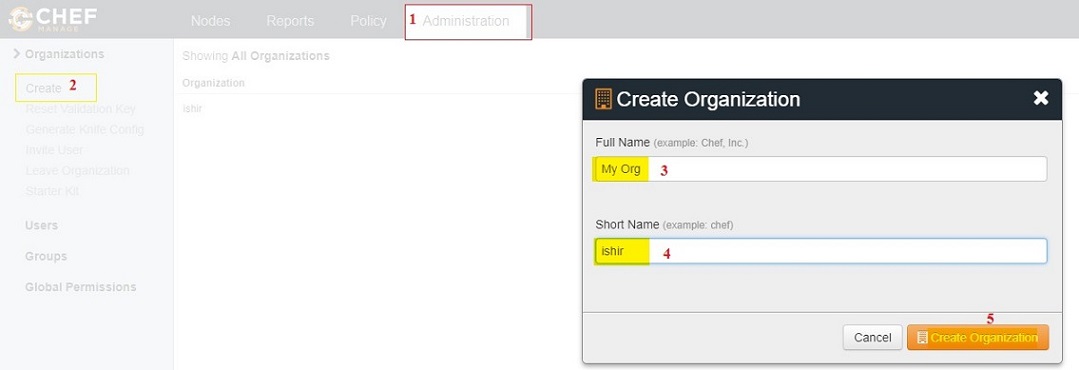
- Click on administration tab and choose to Create button under the organization
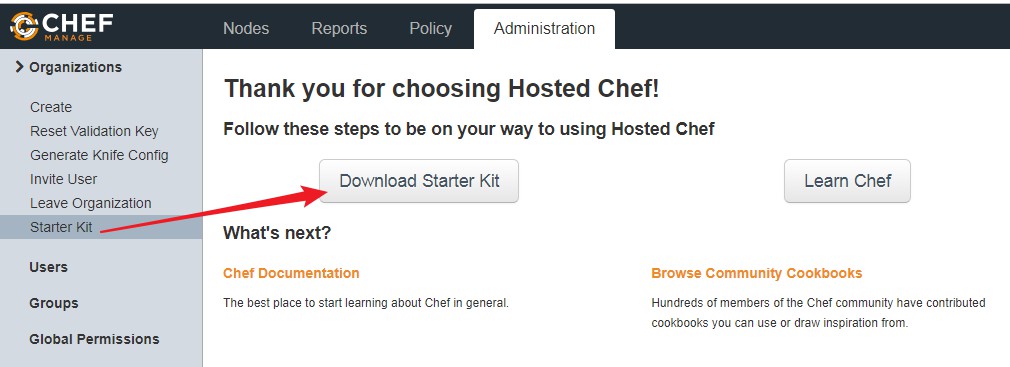
- Download Starter Kit- it provides an interface between chef workstation and chef Server to communicate and upload cookbook to chef server.
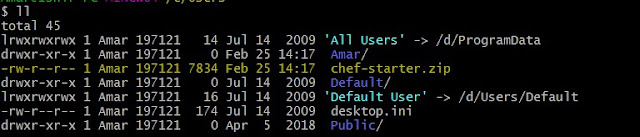
- Once Download finished, Go to the downloaded directory.
In the above screenshot highlighted is my Deployment kit name.- Extract Starter Kit on your Workstation.
- Go to Chef-repo directory
- Verify extracted files with .chef configuration file.
Please remember to create and upload cookbook to chef server inside this directory Because it has Chef Server organization information and private key to communicate chef server. You can check Chef server details in .chef file.
Now, We are ready to start writing recipes and start upload cookbook to Chef server.
Step 3- Start Writing Chef recipes and cookbook.
- Generate template for your own custom cookbook, though N number of cookbooks are available on the Internet. In this Example, I'm going to demonstrate Jenkins installation using Chef cookbook.
- Open configuration file:
- Append following configuration
- Jenkins installation Cookbook is ready. Let's upload to our hosted Chef Server.
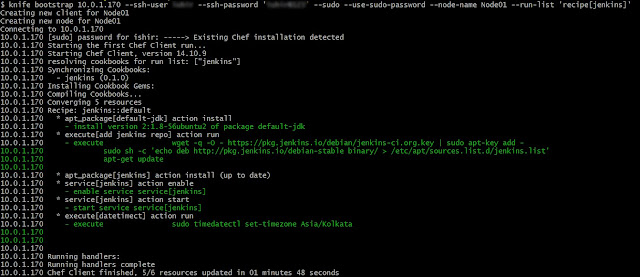
Step 4- Perform Jenkins installation on the remote machine using a cookbook.
- Make sure you can SSH to the Node from Workstation. Run the following command to perform an installation with User Name and Password.
- If you have access using Key file run the following command.
Upon successful installation, you will get output like this.
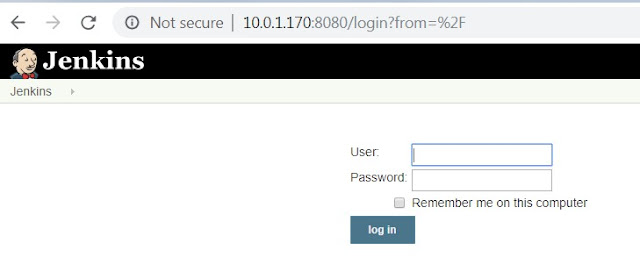
Jenkins installation completed successfully, let's verify the installation by accessing Node01 IP address with Jenkins port - 8080
http://10.0.1.170:8080/
Jenkins installation is done successfully. Now you can create your own custom Chef cookbook for various configuration and installation.
Optional: Now, You can manage your node from your hosted Chef account, You can list your added node in the Chef console. Please see below picture for more detail.
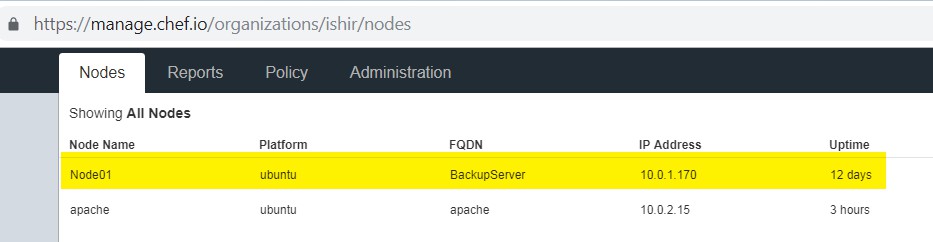
Optional: Now, You can manage your node from your hosted Chef account, You can list your added node in the Chef console. Please see below picture for more detail.
I have read this post. collection of post is a nice one..!!
ReplyDeleteAzure DevOps online training
Microsoft Azure DevOps Training
Microsoft Azure DevOps Online Training
Microsoft Azure DevOps training hyderabad
Azure DevOps online training in hyderabad
Thank you for this informative post.
ReplyDeleteAWS Training
AWS Online Training
AWS Training
AWS certification training
Hey this is really very useful information you are sharing here.Thanks for sharing
ReplyDeleteNode JS Online training
Node JS training in Hyderabad
Perfect for cloud backup solutions for small business , thanks!
ReplyDeleteThanks a lot for this tutorial, great tutorial for
ReplyDeletebeginners.
Angular JS Online training
Angular JS training in hyderabad
Thanks for sharing your knowledge on the topic.
ReplyDeleteDedicated Server UK
Dedicated Server in UK
Dedicated Server Hosting UK
Best Dedicated Server UK
Cheap Dedicated Server UK
Great one, post admin will keep it up...
ReplyDelete5 Instant Approval Site (DoFollow Backlink)
Excellent Chef workstation configuration steps.
ReplyDeletenixDraft - UNIX Linux Tips & How too`s
40 Best Linux Commands You Must Know
Linux Networking Commands
Thanks for Sharing This Article.It is very so much valuable content. I hope these Commenting lists will help to my website
ReplyDeleteAngularJS online training
best AngularJS online training
top AngularJS online training
Thank you for taking time to provide us some of the useful and exclusive information with us. It absolutely was elegantly composed and was very enlightening a lot because of you . The article Windows Server Versions on your web site is richly created . Thanks for sharing.
ReplyDeleteThanks for sharing this information,this is useful to us.It is amazing and wonderful to visit your site. Other wise if any one want to learn linux Get a free demo call on 9311002620 or visit :- https://htsindia.com/Courses/modular-courses/redhat-linux-administration-training-course
ReplyDeleteThanks a lot for sharing this amazing knowledge with us. This site is fantastic. I always find great knowledge from it. Dedicated server hosting in India
ReplyDeleteThanks for Providing such a great information ...keep sharing
ReplyDeleteRHCE Certification Training
ReplyDeleteThis post is so interactive and informative.keep update more information...
Selenium Training in Bangalore
Selenium Training in Pune
Selenium Taining in Hyderabad
Selenium Training in Gurgaon
Selenium Training in Delhi
selenium training in mumbai
selenium training in kolkata
selenium course in kochi
selenium training in ahmedabad
This comment has been removed by the author.
ReplyDeleteBeginners will get complete tutorial about Linux, Cloud & Windows from your blog. This blog is quite good. I am gonna share this with my friends. Also If you want to optimize your website, you must know about USA VPS Hosting . It will be too helpful for your website.
ReplyDeleteVery informative Blog, I really appreciate your Blog. Thank you sharing with us.
ReplyDeleteLinux Operating System
Best linux distribution for gaming
Popular linux distribution in 2021
Looking great work dear. I'm happy to read your blog, really appreciated this quality work. Thanks for sharing. If you want to know about att.net email login you can visit here.
ReplyDeleteExcellent Blog information! No doubt that Cloud computing is a computing paradigm, where a large pool of systems are connected in private or public networks. I would like to thanks for sharing this useful information regarding web hosting.
ReplyDeleteConnect with Mackie Cloud for detail information for Web hosting.
ReplyDeleteThis post is so interactive and informative.keep updating more information...
Becoming A Full Stack Developer
Full Stack Developer Training
ReplyDeleteGreat post. keep sharing such a worthy information
cyber security course in bangalore
cyber security training in chennai
It is very much insightful thanks for the content
ReplyDeleteUi Ux Design Course in Chennai
Best Ui Ux Courses Online
Get USA Customs Data; Grow Your Export Import Trade in Customs & 100+ Countries. Connect With 100% Verified Buyers, and Suppliers. Visit our website for more import, export and shipment data.
ReplyDeleteUSA Customs Data
This comment has been removed by the author.
ReplyDeleteSetting up Chef infrastructure can be complex, but your article simplifies the process nicely. When it comes to hosting, reliability and performance are key. For a hosting provider that excels in these aspects, I'd recommend exploring KemuHost. Their hosting services are a perfect match for Chef automation.
ReplyDeleteUK dedicated servers are a great option for businesses that need reliable performance, strong security, and low-latency connectivity across Europe. With dedicated resources, full control, and scalable infrastructure, UK server hosting is ideal for websites, applications, eCommerce platforms, and enterprise workloads.
ReplyDelete