Kubernetes: Kubernetes is an open source system for automatic deployment, scaling, and management of containerized applications.
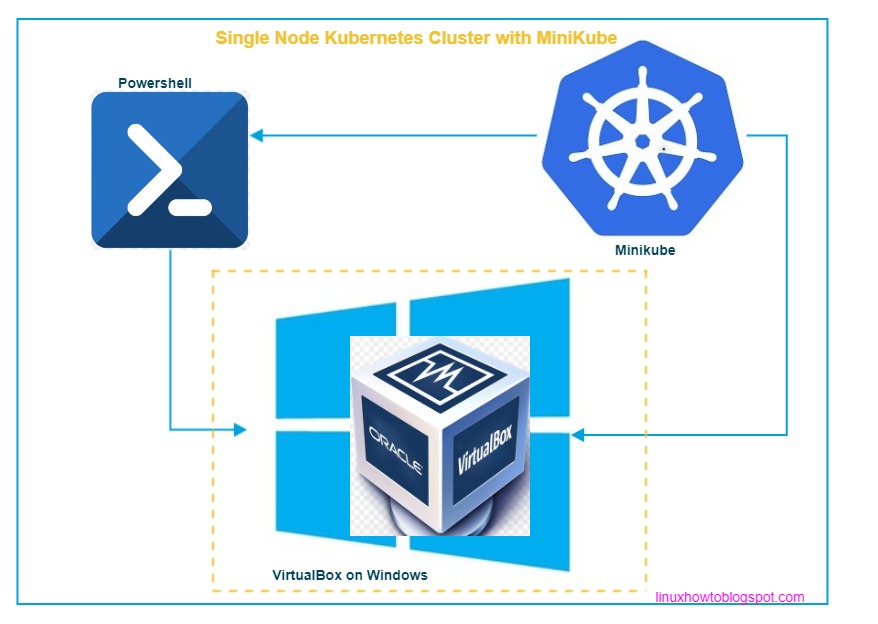
MiniKube: MiniKube is a tool that makes it easy to run a single node kubernetes cluster locally. MiniKube runs a single-node Kubernetes cluster on a Virtual machine inside of your laptop.
Kubernetes Features in MiniKube:

Please follow steps as in the image below.
MiniKube: MiniKube is a tool that makes it easy to run a single node kubernetes cluster locally. MiniKube runs a single-node Kubernetes cluster on a Virtual machine inside of your laptop.
Kubernetes Features in MiniKube:
- DNS
- Node Port
- Dashboard
- Enable CNI (container Network Interface)
- ConfigMap and Secrets
- Ingress
- Container Runtime: Docker, rkt, CRI-O and container
Prerequisites:
- A Windows Machine with admin access
- Installed Virtual box in Windows machine
- Installed Powershell
- VT-x or AMD-v Virtualization enabled
Installation:
Follow the steps below for the installation steps:
Step 1- Install a Hypervisor:
In my this blog I'm using Windows machine to install MiniKube, So I'll use VirtualBox as a hypervisor. Download and install the latest version of VirtualBox from its official site.
Step 2- Install Chocolatey package manager:
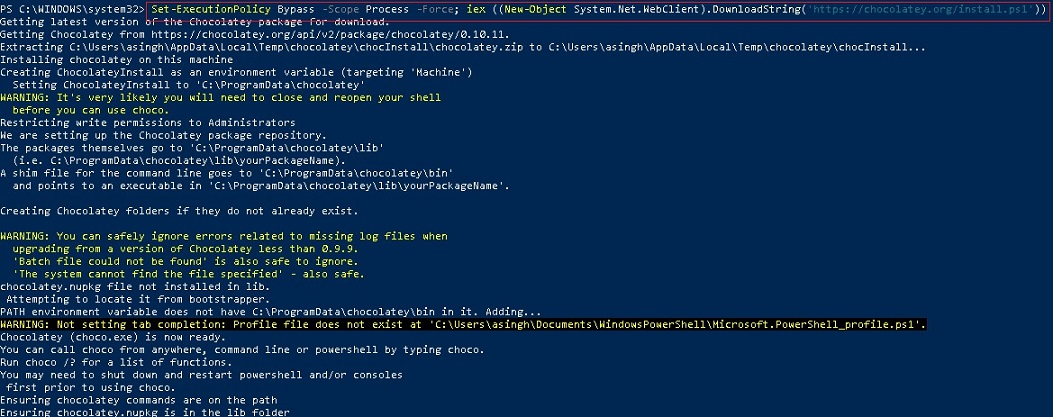
Chocolatey also know as choco, it's a windows package manager. Using choco you can install a package like we do in Linux system. Let's install choco package manager in your windows machine followed by this command.
Open Powershell Run as administrator:
Command output should be like this, there are some warnings, you can ignore them.
Verify choco installation and check the version
Choco package manager installation completed successfully.
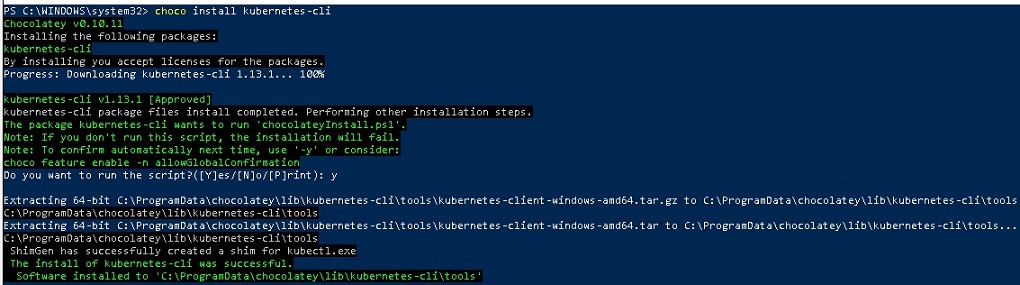
Step 3- Install Kubernetes-cli:
Kubernetes-cli knows as kubectl, It is command line utility to create and manage Kubernetes cluster resource.
Run the following command to install kubectl.
Installation output would be like this
Kubernetes-cli installation completed.
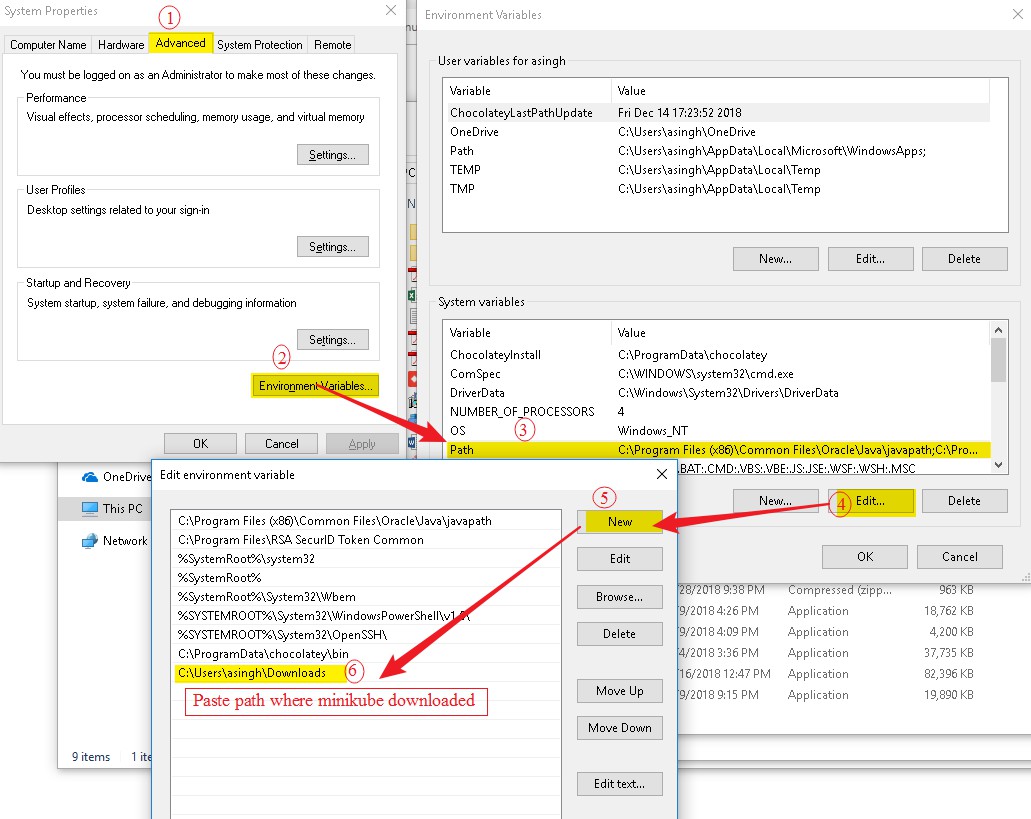
Step 4- Download and set MiniKube environment path:
Download and Install Minikube Windows installer from its official repository.
Once download finish keeps it somewhere in a directory and renames it to minikube. and set an environment variable.
- Go to System properties advanced tab
- Environment variable
- Select path under system variable
- click on Edit
- Click on New
- Paste path where Minikube available and click on Ok.
Please follow steps as in the image below.
Once Minikube Environment path set. We are ready to start Minikube.
Step 5- Start Minikube
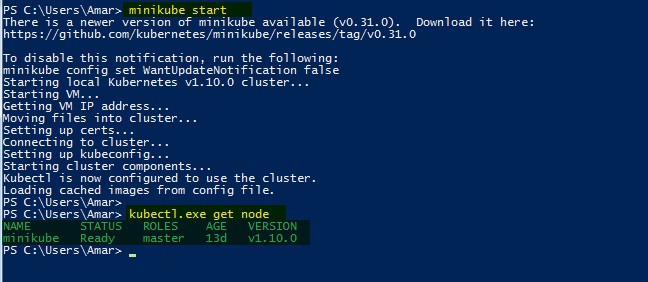
After successful installation of dependencies and Minikube, it's time to start minikube. run the following command at Powershell to start minikube.
The above command will start kubernetes cluster, download minikube ISO, and create a VM like in below image.
TO get node details run command kubectl get node:
Your Single node Kubernetes cluster is ready.
Step 6- Create your first deployment:
In order to run your container, we need to create deployment first. let's run the following command to create the deployment. We can use .yml or .json file to create deployment but in this blog, we are using a single command to create deployment and service in step 7.
Where :
Kubectl run - command to create a deployment
web - Deployment name
--image=httpd2.4 - To define docker image path
--port=80 - Define port on which your app running.
Verify created Deployment:
Check created pods:
our deployment created successfully and the pod is available and running.
Step 7- Create Service to expose deployment using type NodePort:
Once deployment created successfully, let's create service to access container application from outside. Kubernetes support multiple methods to expose our deployment i.e. NodePort and LoadBalancer.
let's follow the below command to expose our deployment.
Let's verify exposed service.
Deployment exposed successfully for external access.
Step 8- Verify exposed deployment's external access:
To verify external access of deployment. first, check minikube IP address. Run the following command.
My Minikube IP address is 192.168.99.100. Now, let's check our exposed service port.
So, our exposed deployment running with port 31178. Now Open browser and hit minikube IP and Port 31178 to check external access.
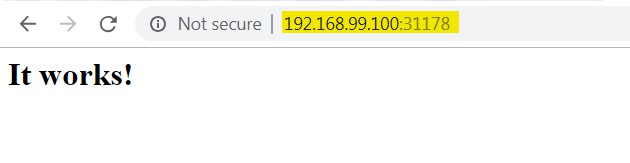
Running Pod is accessible from the outside of my Network using the minikube IP address.
Step 9- Expose deployment using service Type LoadBalancer:
In step 7 we exposed our deployment using NodeType service. Now let's use service type Loadbalancer.
Verified created service:
Deployment exposed using service type LoadBalancer. Let's verify external access using minikube IP and LoadBalancer port (30484)
 Our App is available our service type Loadbalancer.
Step 9- Scale our deployment:
Using Kubernetes, we can scale our deployment anytime. our current deployment has a single pod. you can verify it by running a command- kubect get pods. In order to scale our deployment let's use following command.
Above command will scale our deployment and no of running pods will be 2.
let's verify running pods using the command below.
We just scaled our deployment and you can see new Pod creation is in progress. Run above command again to verify that both pods are available and running.
Verified and our second pod available and running.
We have successfully built our single node Kubernetes cluster using Minikube and were able to built deployment, Service and pods.
Step 10- Delete service:
Once, you have done with the testing and you want to delete service, run the following command.
Where:
Kubectl delete - is a command
Service - is a command
webservicelb - is your service name
Step 11- Delete Deployment:
In order to stop pods, we need to delete our deployment. run the command below to delete deployment.
In the above command web is your deployment. replace it with your deployment name to delete.
Successfully deleted deployment and service. Now, if you will run the command kubectl get pods output will be null.
Step 12- Run Minikube dashboard in the browser:
Minikube gives us the GUI interface to manage kubernetes cluster resource. To access GUI dashboard run the below command.
The above command will open your default browser window and you will see kubernetes cluster resource in the GUI window.
Your Single node Kubernetes cluster is ready.
Step 6- Create your first deployment:
In order to run your container, we need to create deployment first. let's run the following command to create the deployment. We can use .yml or .json file to create deployment but in this blog, we are using a single command to create deployment and service in step 7.
Where :
Kubectl run - command to create a deployment
web - Deployment name
--image=httpd2.4 - To define docker image path
--port=80 - Define port on which your app running.
Verify created Deployment:
Check created pods:
Step 7- Create Service to expose deployment using type NodePort:
Once deployment created successfully, let's create service to access container application from outside. Kubernetes support multiple methods to expose our deployment i.e. NodePort and LoadBalancer.
let's follow the below command to expose our deployment.
Let's verify exposed service.
Deployment exposed successfully for external access.
Step 8- Verify exposed deployment's external access:
To verify external access of deployment. first, check minikube IP address. Run the following command.
My Minikube IP address is 192.168.99.100. Now, let's check our exposed service port.
So, our exposed deployment running with port 31178. Now Open browser and hit minikube IP and Port 31178 to check external access.
Running Pod is accessible from the outside of my Network using the minikube IP address.
Step 9- Expose deployment using service Type LoadBalancer:
In step 7 we exposed our deployment using NodeType service. Now let's use service type Loadbalancer.
Verified created service:
Deployment exposed using service type LoadBalancer. Let's verify external access using minikube IP and LoadBalancer port (30484)
Our App is available our service type Loadbalancer. Step 9- Scale our deployment:
Using Kubernetes, we can scale our deployment anytime. our current deployment has a single pod. you can verify it by running a command- kubect get pods. In order to scale our deployment let's use following command.
Above command will scale our deployment and no of running pods will be 2.
let's verify running pods using the command below.
We just scaled our deployment and you can see new Pod creation is in progress. Run above command again to verify that both pods are available and running.
Verified and our second pod available and running.
We have successfully built our single node Kubernetes cluster using Minikube and were able to built deployment, Service and pods.
Step 10- Delete service:
Once, you have done with the testing and you want to delete service, run the following command.
Where:
Kubectl delete - is a command
Service - is a command
webservicelb - is your service name
Step 11- Delete Deployment:
In order to stop pods, we need to delete our deployment. run the command below to delete deployment.
In the above command web is your deployment. replace it with your deployment name to delete.
Successfully deleted deployment and service. Now, if you will run the command kubectl get pods output will be null.
Step 12- Run Minikube dashboard in the browser:
Minikube gives us the GUI interface to manage kubernetes cluster resource. To access GUI dashboard run the below command.
The above command will open your default browser window and you will see kubernetes cluster resource in the GUI window.

Thanks for sharing.
ReplyDeleteDocker Kubernetes Online Training
This was truly awesome. Thanks so much for this..!
ReplyDeleteBest Docker Training
Docker Online Training
Kubernetes Online Training
Docker and Kubernetes Training
I would like to thank you for the efforts you have made in writing this article, Its good and Informative.
ReplyDeletekubernetes online training