Docker:
Docker is the most revolutionized technology in virtualization world nowadays. Docker is actually an open source project which provides container technology. A container is a lightweight VM(virtual machine) or a process which allows us to install Linux based applications inside it. The container doesn’t have its own Kernel, RAM, CPU and Disk but it uses the underlying OS kernel, RAM, CPU cores and Disk.
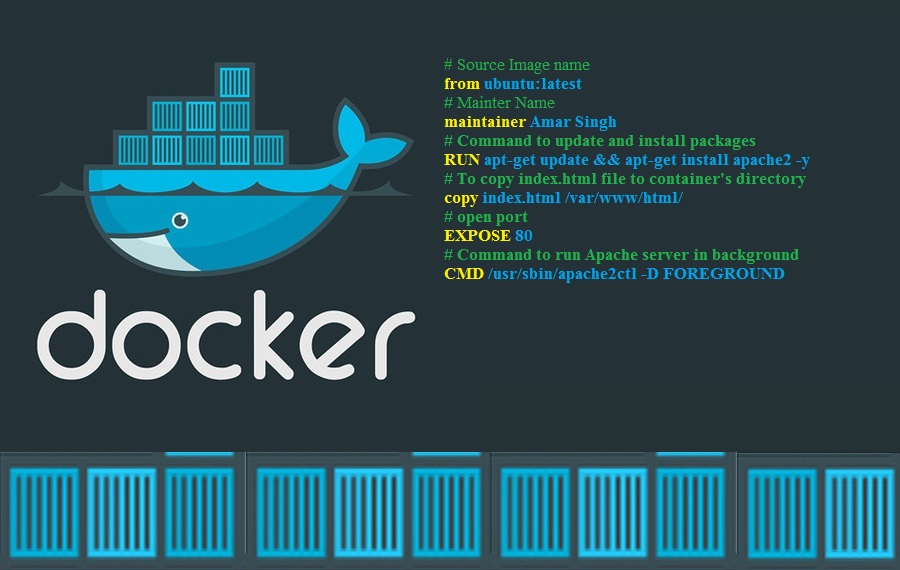
In my this blog, I'm going to demonstrate, How to use Dockerfile to build own image with custom software. I'll install Apache2 server using Ubuntu 16.04 official docker image.
Prerequisites:
- An Ubuntu box with installed Docker.
- One User with sudo access.
Step 1- Install Docker in Ubuntu 16.04:
Please follow Step by Step installation of Docker my previous blog- https://linuxhowtoguide.blogspot.com/2018/08/how-to-install-docker-in-ubuntu-1604-lts.html
Step 2- Create Dockerfile:
In order to create Dockerfile, please follow the steps below.
- Create Directory and cd into it.
- Create index.html file
- Create Dockerfile
Add following line into this
Save and Exit from the file.
Step 3- Build Docker image using Dockerfile:
Step 3- Build Docker image using Dockerfile:
Now, We will build our Image using Dockerfile, let's run following command to build Docker image.
Where:
docker build - Is command to build an image
-t - To assign a tag to the Image
apache:2.4 - Image tag name
docker build - Is command to build an image
-t - To assign a tag to the Image
apache:2.4 - Image tag name
After successful execution of above command, your Image will be ready.
Let's check Image using command "docker image ls"
Our docker image is ready, let's launch a container.
Step 4- Launch a container using our build image:
In order to run a container, execute the following command on the terminal
In order to run a container, execute the following command on the terminal
Let's check created container :

Your custom docker image is ready.
Step 5- Push your Custom image to Docker hub account
You can upload your custom docker image to your own docker hub account and can be used over any system anytime. Let's follow the steps below to push your docker image to Docker hub account.
- Sign up to https://hub.docker.com/ if you don't have a docker hub account
- Sign in to your docker hub account on your Linux server.
Enter your Docker hub login password. After, successful authentication your output will be "Login Succeeded"
- First, check your available Images:
- Tag your custom image with your docker hub account
Where:
docker tag - is a command to tag Image
apache:2.4 - Image name that we will tag with our docker hub account name
amarsingh3d - our docker hub account name
/apache2.4 - Tag name
- Let's check your tag and image
- Now, Push your custom image.
You have successfully pushed your custom docker image to your Docker hub account.
No comments:
Post a Comment