Wednesday, June 13, 2018

How to install Xampp in Ubuntu

Xampp - Sometime Developer may require to install Xampp in Ubuntu system. Though Linux system comes with LAMP stack. I'm going to demonstrate how to install Xampp in ubuntu based Linux system.
Step 1- Download Xampp installer
As per your requirement, you can download specific PHP version from the official Xampp site.

PHP version 5.6- https://www.apachefriends.org/xampp-files/5.6.36/xampp-linux-x64-5.6.36-0-installer.run

PHP Version 7.0 - https://www.apachefriends.org/xampp-files/7.0.30/xampp-linux-x64-7.0.30-0-installer.run

PHP Version 7.1 - https://www.apachefriends.org/xampp-files/7.1.18/xampp-linux-x64-7.1.18-0-installer.run

PHP Version 7.2 - https://www.apachefriends.org/xampp-files/7.2.6/xampp-linux-x64-7.2.6-0-installer.run

To download a specific version of PHP run the following command. In my case, I'm going to install PHP 5.6 version.
$ wget https://www.apachefriends.org/xampp-files/5.6.36/xampp-linux-x64-5.6.36-0-installer.run
Step 2- Make file executable and run the Installer file to complete the download.
To make file executable run the command below.
$ chmod +x xampp-linux-x64-5.6.36-0-installer.run
To complete the installation run the command below.
$ ./xampp-linux-x64-5.6.36-0-installer.run
follow the steps to finish the installation process.
After 100% installation, your Xampp is ready to use. To access default, Apache page browse Server IP address-  http://192.168.102.10/dashboard/
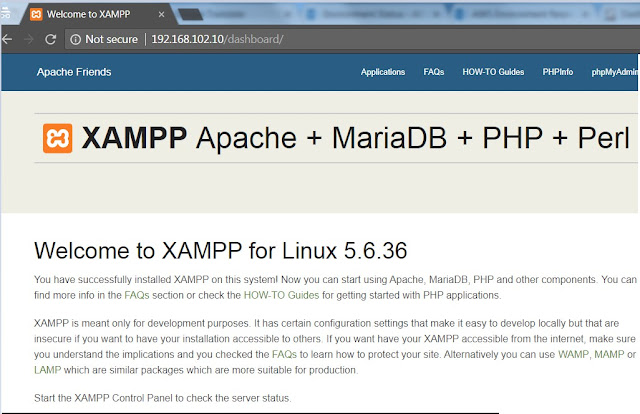
Your Xampp is ready to use.
Some Xampp related Important commands.


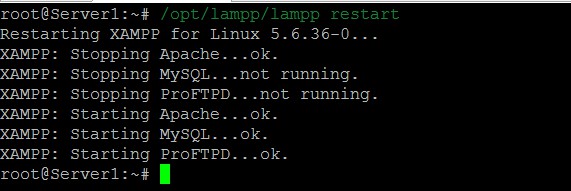
1- Command to restart Xampp

$ sudo /opt/lampp/lampp restart
2- Restart Apache service only
$ sudo /opt/lampp/ctlscript.sh restart apache
3- Restart MySQL service only
$ sudo /opt/lampp/ctlscript.sh restart mysql
4- Check PHP version
$ /opt/lampp/bin/php -v
5- Check Apache version

$ /opt/lampp/bin/apachectl -v
6- Check Mysql version

$ /opt/lampp/bin/mysql -V


Thursday, June 7, 2018

Ubuntu14.04 setup unattended security update

Ubuntu 14.04 doesn't support auto security update, to keep our servers' security patch we need to install security updates manually time to time. 
In this blog series, I am going to demonstrate how to configure unattended security updates for Ubuntu 14.04

Prerequisites- 

  • One Ubuntu 14.04 VM
  • A user with sudo access.

Step 1- Install unattended-upgrades package
Run the following commands to install package.
$ apt-get update
$ apt-get install unattended-upgrades
Step 2- Configure unattended upgrade
$ dpkg-reconfigure unattended-upgrades

It will generate two configuration files:
1- 20auto-upgrades 
2- 50unattended-upgrades

Step 3- modify 20auto-upgrades file.
Open 20auto-upgrades file and append following lines.
$ vi /etc/apt/apt.conf.d/20auto-upgrades
Append these two lines if doesn't exist already.
APT::Periodic::Update-Package-Lists "1";
APT::Periodic::Unattended-Upgrade "1";
Save and exit from the file.

Where :
APT::Periodic::Update-Package-Lists "1";
Update the package list daily, this is really important to keep all the repository up-to-date
APT::Periodic::Unattended-Upgrade "1";
Download updates daily, You can modify it as per your requirement.

Step 4- Modify 50unattended-upgrades file to download and install security updates only.
Open the file in VI editor and modify it as follow
$ vi /etc/apt/apt.conf.d/50unattended-upgrades
Match your file like this
// Automatically upgrade packages from these (origin:archive) pairs
Unattended-Upgrade::Allowed-Origins {
        "${distro_id}:${distro_codename}-security";
        // Extended Security Maintenance; doesn't necessarily exist for
        // every release and this system may not have it installed, but if
        // available, the policy for updates is such that unattended-upgrades
        // should also install from here by default.
        "${distro_id}ESM:${distro_codename}";
//      "${distro_id}:${distro_codename}-updates";
//      "${distro_id}:${distro_codename}-proposed";
//      "${distro_id}:${distro_codename}-backports";
};

// List of packages to not update (regexp are supported)
Unattended-Upgrade::Package-Blacklist {
//      "vim";
//      "libc6";
//      "libc6-dev";
//      "libc6-i686";
};

// This option allows you to control if on a unclean dpkg exit
// unattended-upgrades will automatically run
//   dpkg --force-confold --configure -a
// The default is true, to ensure updates keep getting installed
//Unattended-Upgrade::AutoFixInterruptedDpkg "false";

// Split the upgrade into the smallest possible chunks so that
// they can be interrupted with SIGUSR1. This makes the upgrade
// a bit slower but it has the benefit that shutdown while a upgrade
// is running is possible (with a small delay)
//Unattended-Upgrade::MinimalSteps "true";

// Install all unattended-upgrades when the machine is shuting down
// instead of doing it in the background while the machine is running
// This will (obviously) make shutdown slower
//Unattended-Upgrade::InstallOnShutdown "true";

// Send email to this address for problems or packages upgrades
// If empty or unset then no email is sent, make sure that you
// have a working mail setup on your system. A package that provides
// 'mailx' must be installed. E.g. "user@example.com"
//Unattended-Upgrade::Mail "root";
// Do automatic removal of new unused dependencies after the upgrade
// (equivalent to apt-get autoremove)
//Unattended-Upgrade::Remove-Unused-Dependencies "false";

// Automatically reboot *WITHOUT CONFIRMATION*
//  if the file /var/run/reboot-required is found after the upgrade
//Unattended-Upgrade::Automatic-Reboot "false";

// If automatic reboot is enabled and needed, reboot at the specific
// time instead of immediately
//  Default: "now"
//Unattended-Upgrade::Automatic-Reboot-Time "02:00";

// Use apt bandwidth limit feature, this example limits the download
// speed to 70kb/sec
//Acquire::http::Dl-Limit "70";

Save and Exit from the file.
You Ubuntu 14.04 is ready to install security updates automatically.

Step 5- Test your configuration
Perform a dry-run to make sure the correct packages are downloaded:
$ unattended-upgrade -v -d --dry-run
If it looks good and showing correct packages:
$ unattended-upgrade -v -d

Make sure that the upgrade completed successfully. Now you can leave this to run automatically.